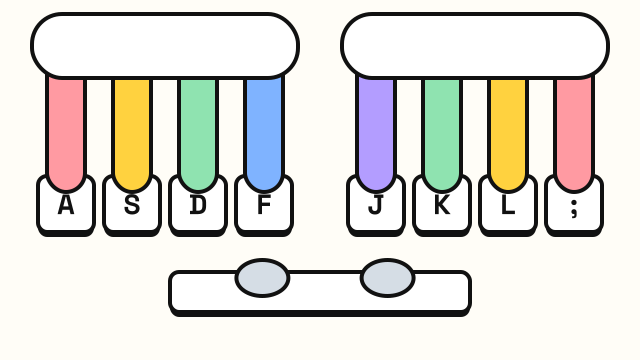
10 finger typing means using all ten fingers, each with its own set of keys, so you can type without searching the keyboard. It's the same thing people call touch typing. If you currently type with two or three fingers and look down for most letters, this guide explains how the system works and gives you a clear order to learn it in, with a practice routine you can start today.
What 10 finger typing actually is
On a standard QWERTY keyboard, each finger is assigned a vertical-ish column of keys. Your fingers rest on a "home" position in the middle row and reach up or down to nearby keys, then come back. Because every key always belongs to the same finger, your hands learn the positions by feel, and your eyes stay on the screen.
The home position is:
| Hand | Pinky | Ring | Middle | Index |
|---|---|---|---|---|
| Left | A | S | D | F |
| Right | ; | L | K | J |
Your thumbs rest on the space bar. Most people use the thumb of their dominant hand for spaces, but either is fine as long as you're consistent. The F and J keys have small raised bumps so your index fingers can find home without looking.
The two index fingers do the most work: each covers two columns. The left index handles R F V and T G B, and the right index handles U J M and Y H N. The full map of every key, including numbers and symbols, is in the touch typing finger chart.
10 finger typing: the order to learn it in
Trying to learn every key at once is overwhelming. A row-by-row approach works well because each new key is a short reach from keys you already know. This is the order the EnjoyTyping typing lessons use:
- Home row. F and J first, then D K, S L, A ;, and finally G H. This is the foundation, so give it time.
- Top row. E I, R U, T Y, W O, Q P. Reach up and come straight back.
- Bottom row. V M, C and comma, X and period, Z and slash, B N.
- Capitals and punctuation. Shift with the opposite hand, plus common punctuation.
- Numbers and symbols. The number row and characters like @ # $ %.
- Speed drills. Common words, sentences and paragraphs.
Learning keys in pairs, one per hand, keeps both hands working evenly. Each lesson level on the site introduces a key with an animated finger path, drills it alone, mixes it with earlier keys, then uses it in short words.
Four rules that matter more than anything else
1. Always return to home. After a finger reaches for a key, it goes back to its home key. This is what keeps your hands oriented. If you ever feel lost, touch the bumps on F and J.
2. Use the assigned finger, even when it feels slow. The right index finger will want to press everything on the right side. Resist. Using the correct finger feels awkward for the first days and then becomes automatic.
3. Don't look down. Glance at an on-screen keyboard or a chart instead of your hands. Looking at the keys teaches your eyes, not your fingers. There's a whole guide on how to stop looking at the keyboard if this is the hardest part for you.
4. Accuracy before speed. Type slowly enough that you make few mistakes, and aim for about 95% accuracy. Speed comes from repetition of correct movements, not from rushing.
A beginner practice routine
You don't need long sessions. Something like this, once a day, works well:
| Time | Activity |
|---|---|
| 2 minutes | Warm up on keys you already know, slowly and accurately |
| 8–10 minutes | Work on the current lesson: one new key pair |
| 3 minutes | Type short real words using only learned keys |
| 1–2 minutes | Note which keys you missed most and repeat them |
Move on when you hit the target for your current level, not when a set time has passed. The home row level passes at 95% accuracy and 10 WPM, and the targets rise gradually through later levels. You can start right away with Course 1: Home Row.
What to expect in the first weeks
- It will feel slow. If you typed 30 WPM with two fingers, your 10 finger speed may start well below that. This is normal and temporary.
- Some fingers are weaker. The pinkies and ring fingers are less practiced. Keys like A, Q, Z, P and the semicolon usually take longer to feel natural.
- Some keys get confused. Common mix-ups for beginners are B and N (the left index reaches right for B), and C and X. Slow drills on those pairs fix them.
- Progress comes in jumps. You might feel stuck for a few days and then suddenly find a row easy.
When all the letters feel familiar, take a one-minute typing test to get a baseline, then retest once a week.
Common beginner mistakes
Resting palms on the desk while typing. This locks your hands and forces your fingers to stretch. Let your palms float slightly above the keys.
Hitting keys too hard. A light press is enough. Heavy keystrokes tire your fingers and slow the next keystroke.
Moving the whole hand for every key. Small reaches should come from the finger. A slight hand shift is fine for far keys like the number row, but your hand should return to home right after.
Practicing only what's easy. It's tempting to repeat the home row forever because it feels good. Once you pass a level, move on and let your weaker keys catch up.
Frequently asked questions
Is 10 finger typing the same as touch typing?
Yes, in everyday use the terms mean the same thing: typing with all fingers, each on assigned keys, without looking at the keyboard.
Which thumb should press the space bar?
Either thumb is correct. Many people use the thumb of their dominant hand, and some alternate depending on which hand typed the last letter. Pick one approach and stay consistent.
How long should a beginner practice each day?
Around 15–20 minutes a day is a good amount for most beginners. Short, regular sessions are more effective than occasional long ones.
Is 10 finger typing faster than typing with a few fingers?
Some self-taught typists who use fewer fingers are quick, but 10 finger typing spreads the work across every finger, keeps your eyes on the screen, and gives most people a higher ceiling for both speed and accuracy.