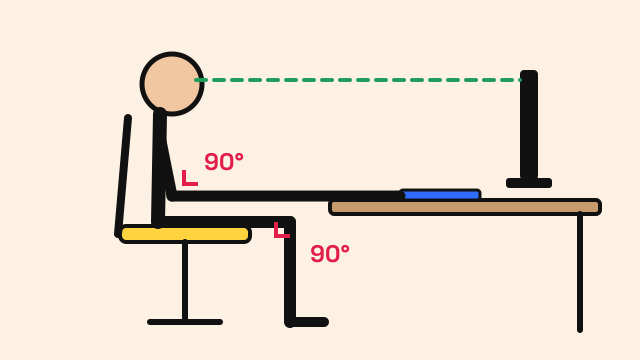
Proper typing posture is the way you set up your body, chair, desk and keyboard so that your hands can move freely and your neck, shoulders and wrists aren't straining. It has a direct effect on speed, too. When your arms are tense or your wrists are bent, your fingers travel less cleanly and you tire sooner. This guide walks through each part of the setup, from the floor up, and ends with a short checklist you can run before any practice session.
A quick note before we start: this is general ergonomic advice for comfortable typing, not medical advice. If you have ongoing pain, numbness or tingling in your hands or arms, talk to a doctor or physical therapist.
Proper typing posture from the ground up
It helps to adjust things in order. Change your chair first, then your desk and keyboard, then your screen. Each step depends on the one before it.
Feet and chair
- Feet flat. Both feet should rest flat on the floor or on a footrest. If your feet dangle after you raise the chair, a footrest or a sturdy box fixes it.
- Knees around hip level. Your thighs should be roughly parallel to the floor, with a small gap between the seat edge and the back of your knees.
- Back supported. Sit all the way back so the chair supports your lower back. A small cushion works if the chair has no lumbar support.
- Upright, not rigid. A slight recline, a few degrees past vertical, is fine. The goal is a relaxed spine, not a soldier's pose.
Shoulders and elbows
Let your shoulders drop. Many people raise them without noticing, especially when concentrating on a typing test. Your upper arms should hang close to your sides, and your elbows should be bent at about 90 degrees or slightly more open. If your elbows are well below the keyboard, the desk is too high for you (or the chair too low). If they are above it, the reverse.
Wrists and forearms
Your forearms should run roughly level from elbow to keyboard, and your wrists should stay straight, in line with your forearms. Three common wrist problems to watch for:
| Problem | What it looks like | Usual fix |
|---|---|---|
| Bent up | Wrists tilted back, fingers reaching down | Lower the keyboard or fold in its rear feet |
| Bent down | Wrists drooping below the key level | Raise the chair or keyboard slightly |
| Bent sideways | Hands angled out toward the edges | Center your body on the keyboard, bring elbows in |
Many keyboards ship with little feet at the back. They look helpful, but they often tilt the wrists upward. Try typing with them folded in and see which feels more neutral.
Palms and wrist rests
While you type, your palms should float just above the keyboard or the desk. A wrist rest is for pauses, not for anchoring your hands during typing. If you rest your wrists and then stretch your fingers to reach the top and bottom rows, you bend your wrists back and forth hundreds of times a minute. Floating lets your whole hand shift slightly toward each key instead.
Hand shape on the keys
Posture continues past the wrist. Curve your fingers gently, as if holding a tennis ball, and rest the fingertips on the home row: A S D F for the left hand, J K L ; for the right. Your thumbs hover over the space bar. The small bumps on F and J let you find this position without looking. If this is new to you, the home row keys guide explains it in detail, and Course 1 of the typing lessons lets you practice it with a finger guide.
Press keys with a light touch. Most keyboards register a key well before it hits bottom, so pounding each key wastes effort and adds impact on your fingers. Return each finger to the home row after it finishes a reach.
Screen and keyboard placement
- Keyboard directly in front of you. Center yourself on the letter keys, roughly between G and H, rather than on the whole keyboard including the number pad.
- Mouse close by. Keep the mouse at the same height as the keyboard and close enough that you don't stretch your arm sideways to use it.
- Screen about an arm's length away. Put the top of the screen at or slightly below eye level, so you look slightly down at the text.
- Laptop users. A laptop forces a trade-off: either the screen is too low or the keyboard too high. For long sessions, raise the laptop on a stand and use a separate keyboard.
- Reduce glare. Tilt the screen or adjust lighting so you are not leaning forward to read.
Standing desks follow the same rules. Elbows at about 90 degrees, wrists straight, screen near eye level. Alternating between sitting and standing is common, as long as you readjust the desk height each time.
Movement matters as much as position
Even a perfect setup gets uncomfortable if you hold it without moving for hours. Short, frequent breaks help more than rare long ones. A few habits that are easy to keep:
- Stand up and move for a minute or two roughly every half hour.
- Every so often, look at something far away to rest your eyes.
- Open and close your hands, roll your shoulders, and let your arms hang loosely for a few seconds.
- Keep practice sessions short. Ten or fifteen focused minutes of typing practice is plenty.
A quick posture checklist
Run through this before a typing test or a lesson:
- Feet flat, back supported.
- Shoulders down and relaxed.
- Elbows near your sides, bent about 90 degrees.
- Wrists straight and floating, not resting while typing.
- Fingers curved, fingertips on A S D F and J K L ;.
- Screen an arm's length away, top at or below eye level.
- Light touch on the keys.
If you notice tension during a test, it usually shows up first in the shoulders or the jaw. Pause, breathe out, drop your shoulders and continue. Tension slows fingers down more than most people expect, which is one reason relaxed typists tend to be both faster and more accurate. For more on building speed once your setup is comfortable, see how to type faster.
Frequently asked questions
What is the correct sitting position for typing?
Sit back in the chair with your lower back supported and your feet flat. Keep your shoulders relaxed, elbows close to your sides and bent at about 90 degrees, and forearms roughly level with the keyboard. Your wrists should be straight and your fingertips resting on the home row.
Should my wrists rest on the desk while typing?
Not while you are actively typing. Let your palms float so your hands can move as a unit toward each key. Use a wrist rest or the desk edge to rest during pauses.
Should I use the feet on the back of my keyboard?
It depends on your setup, but many people find that the raised feet bend the wrists upward. Try both positions and choose the one where your wrists stay closest to straight.
Does posture affect typing speed?
Indirectly, yes. A relaxed, neutral position lets your fingers reach keys with less effort and helps you stay accurate for longer. Tension in the shoulders, forearms or wrists tends to cause more mistakes as a session goes on.